This page shows you how to check your spam folder, and whitelist our sender address on the different popular e-mail providers such as Gmail, Yahoo, Hotmail etc. to ensure delivery in a few easy steps.
(This article has been updated on April 23, 2021)
In today's digital age, there are many different e-mail providers to choose from. With unwanted e-mails becoming a larger problem, e-mail providers have made their spam filters stricter - some more than others.
Unfortunately, these stricter filters can also cause legitimate e-mails to be mistaken as spam or not delivered at all.
Even though we have taken all steps to adhere to the best sender practices such as implementing SPF, DKIM, TLS-encryption, Unsubscribe link on newsletters and similar - some users may still be impacted by strict rules and filters from their respective e-mail service.
In a few easy steps, we will show you how to check your spam folder, and whitelist our sender address to ensure delivery.
Note: We send important notifications to your e-mail address including Forgotten Password E-mails, Account Information, Order Confirmations and Newsletters with important updates. You can always unsubscribe from our newsletter by clicking "Unsubscribe" at the bottom of the e-mail, or by contacting our support representatives.
We will be covering the major e-mail providers in this article, but the general instructions should also help with other providers.
First things to look for
- Check your spam (junk) folder.
- Make sure you entered your e-mail address correctly. If you are unsure you can try to register again.
- Wait 10-15 minutes.
1. Check your spam folder
Note: These steps should be followed on a desktop computer or laptop, and NOT a tablet or mobile device, as the user experience can be different.
Gmail (@gmail.com)
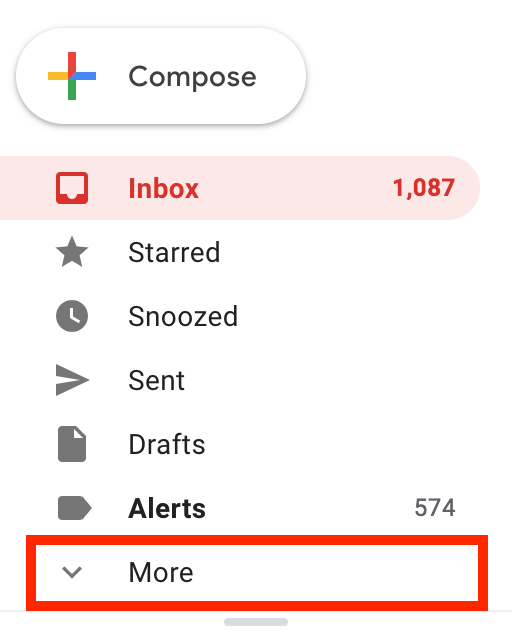
1. Sign into your Gmail webmail account HERE.
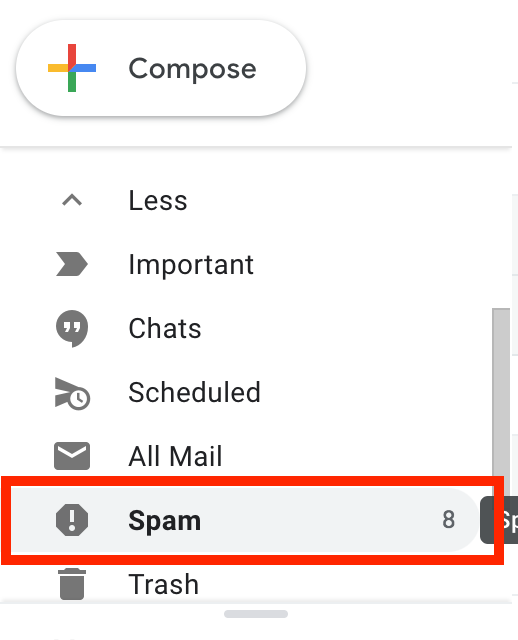
2. If the spam folder does not appear on the left, click on "More".
3. Click on "Spam" to view e-mails marked as spam.
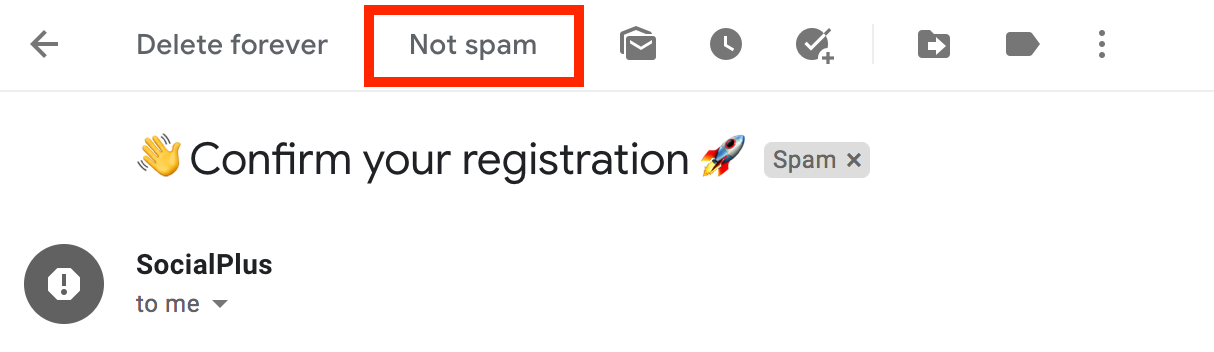
4. Check if the e-mail is here, and make sure to click on "Not spam". Links are not clickable, until you do this.
5. Finally, we also strongly recommend whitelisting our sender address, to ensure delivery on future e-mail as well (or in case you still don't see the e-mail in spam).
Apple (@me.com, @icloud.com, @mac.com)
1. Sign into your Apple iCloud webmail HERE.
2. Click on "Junk/spam folder" to view e-mails marked as spam.
3. Check if the e-mail is here, and make sure to click on "Not spam".
4. Finally, we also strongly recommend whitelisting our sender address, to ensure delivery on future e-mail as well (or in case you still don't see the e-mail in spam).
MSN (@hotmail.com, @outlook.com, @live.com)
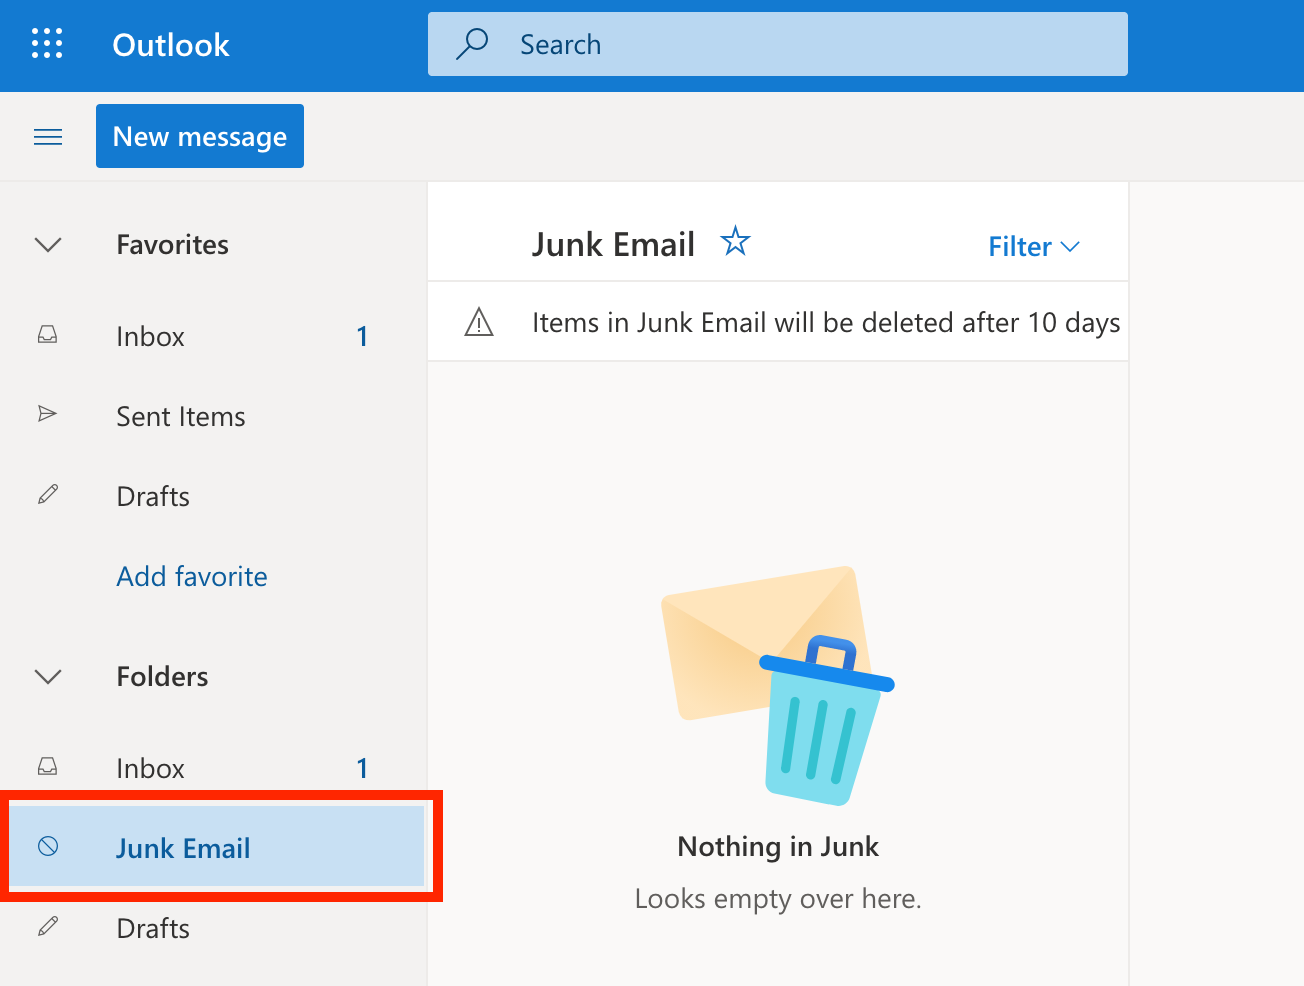
1. Log into your MSN webmail account HERE.
2. Click on "Junk Email" to view e-mails marked as spam.
3. Check if the e-mail is here. If it is, click on "Not junk", and click on the toggle on the right and click on "Add to Safe senders".
4. If this does not work, we strongly encourage you to whitelist our sender address/domain manually. You can see instructions for this further down this page.
Yahoo! Mail
1. Sign into your Yahoo! Webmail account HERE.
2. Click on "Spam" in the left menu.
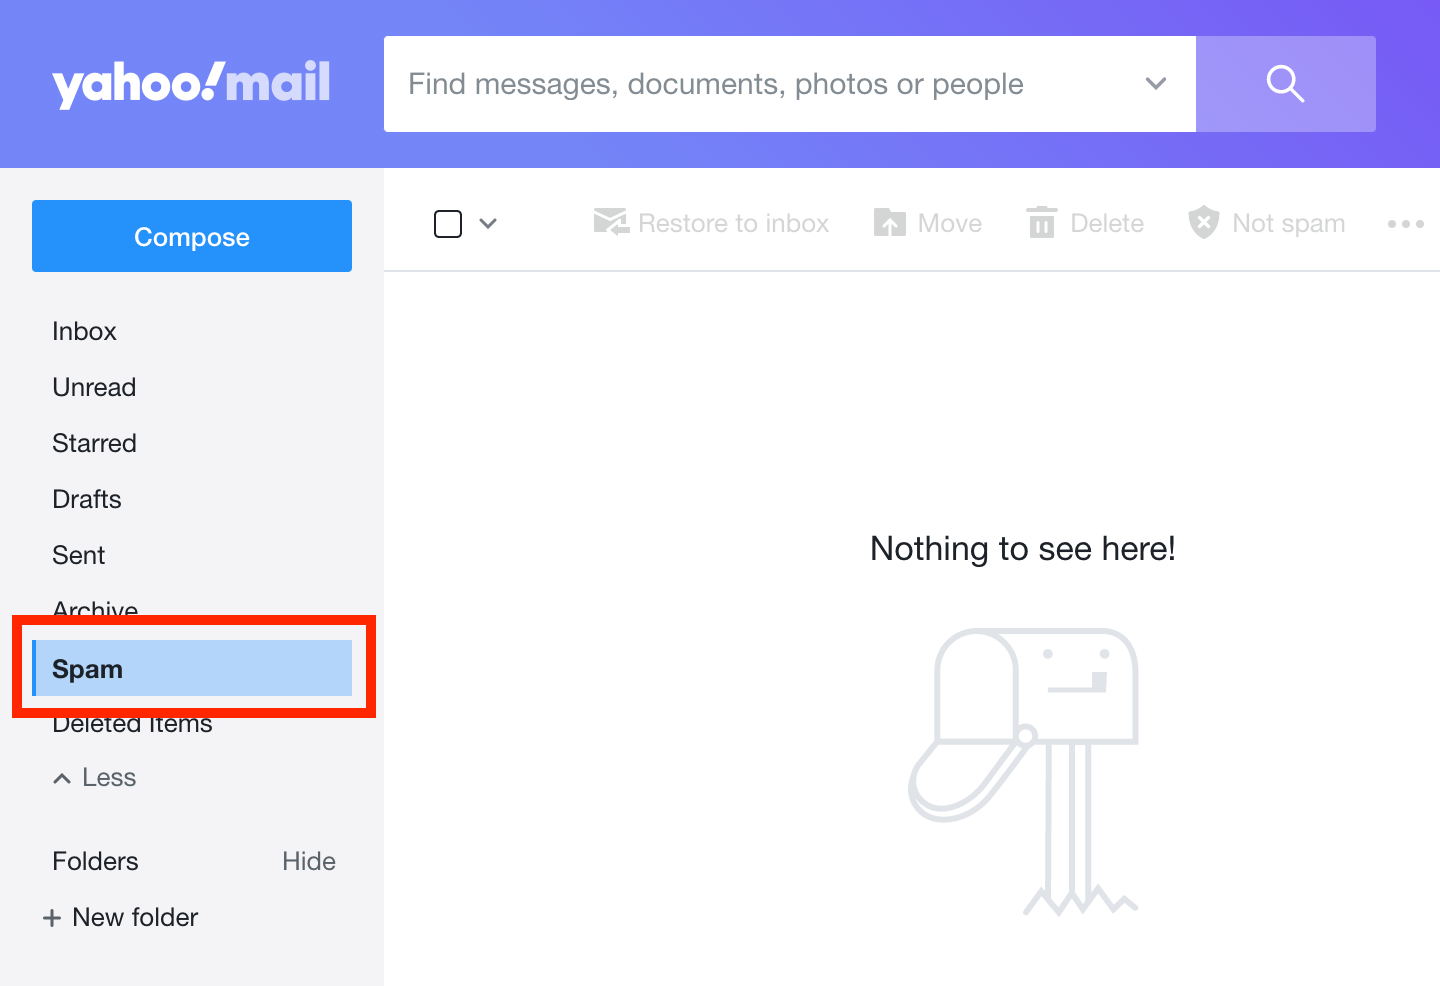
3. Check if the e-mail is here, and make sure to click on "Not spam".
4. We also strongly recommend adding our sender address/domain to your safe senders list. Instructions for doing this on Yahoo! Mail can be found further down this page.
AOL Mail
1. Sign into your AOL webmail account HERE.
2. Click on the "Mail" menu, and then on "Spam folder".
3. Check if the e-mail is here, and make sure to click on "Not spam".
4. Finally, we also strongly recommend whitelisting our sender address, to ensure delivery on future e-mail as well (or in case you still don't see the e-mail in spam).
2. How to whitelist our sender address
Whitelisting a sender address ensures that e-mails from a specific sender are sent to your inbox.
Important: Our sender address is: noreply@socialplus.net or sender *domain* @socialplus.net
Gmail (@gmail.com)
1. Sign into your Gmail webmail account HERE.
2. Click on the "Settings" or gear-icon in the top-right corner, and click on "See all settings".
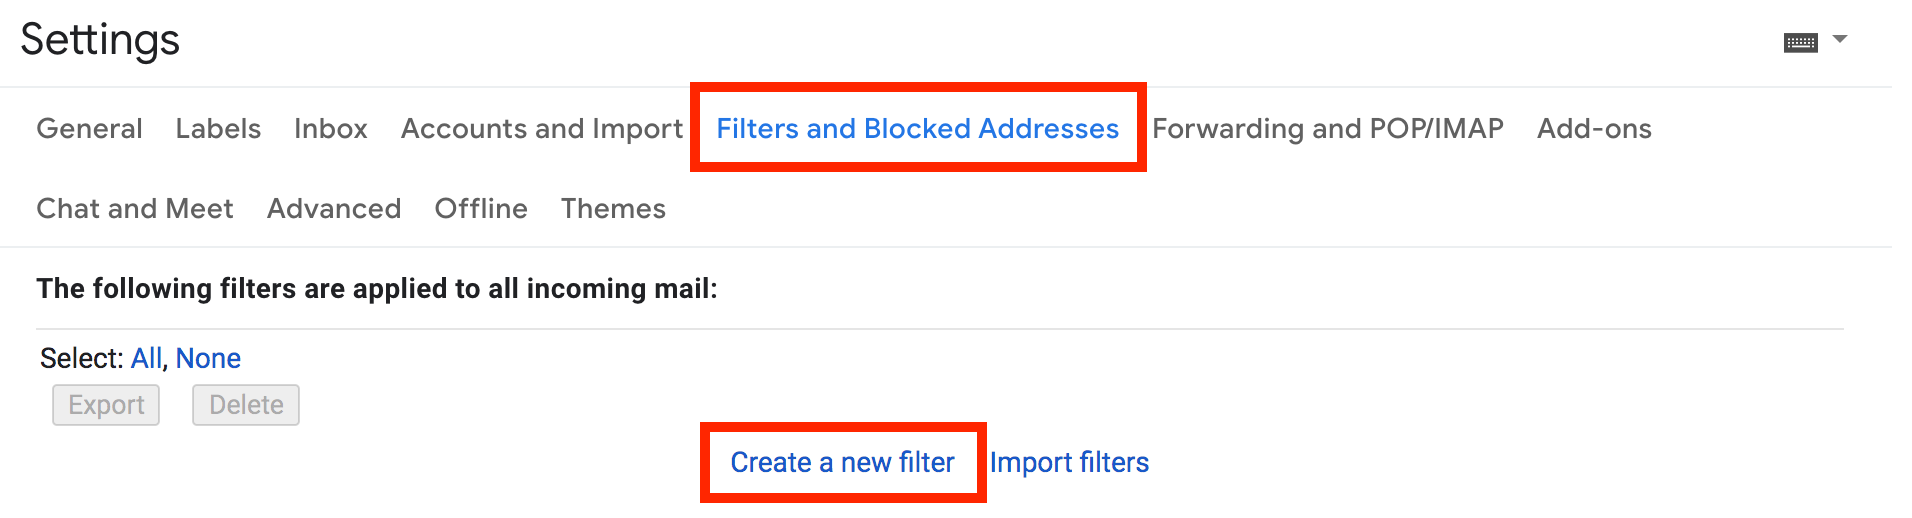
3. Now click on the tab named "Filters and Blocked Addresses". Next, scroll down until you see "Create a new filter", and click on it.
4. In the "From-field" type our sender address @socialplus.net, and click on "Create filter".
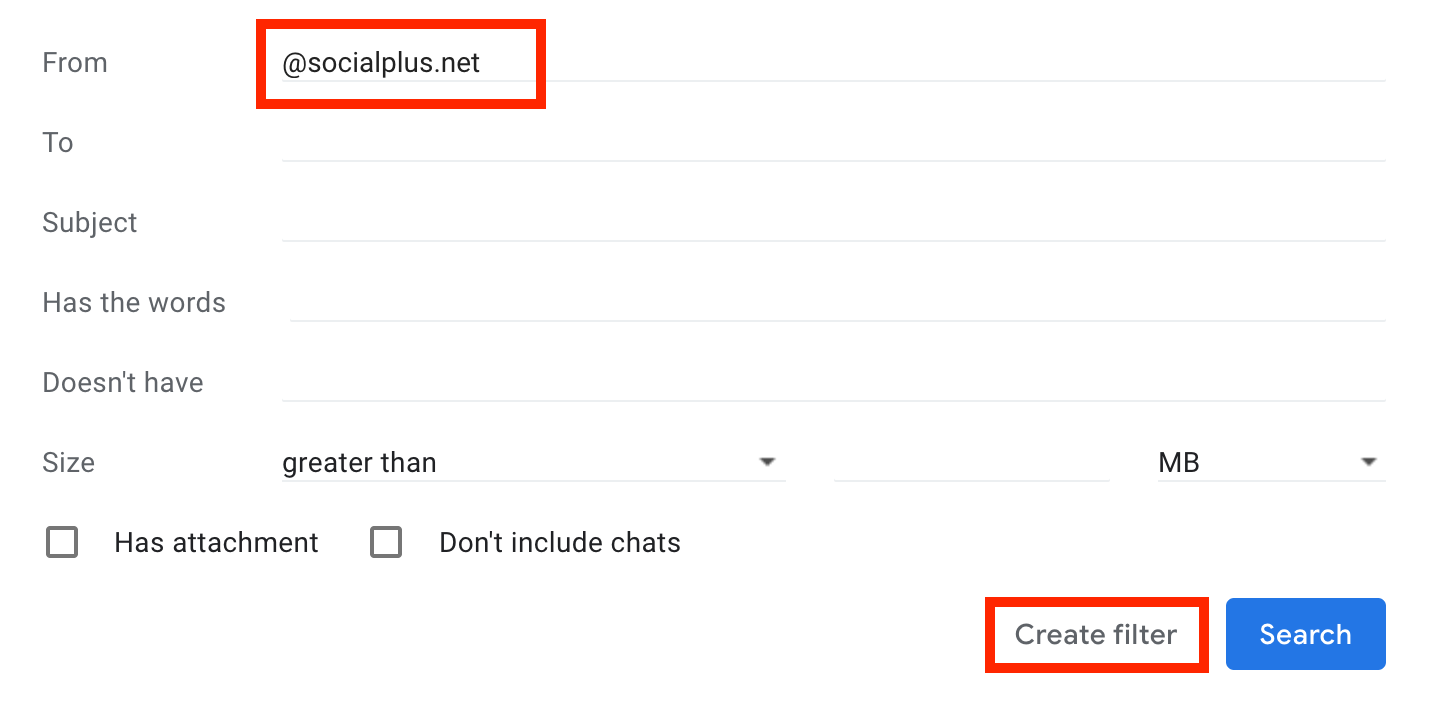
Tip: To whitelist all senders from an entire domain name (e.g. john@doe.com and jane@doe.com) simply enter the domain name preceded by "@", for example "@doe.com" without the quotation marks.
5. Check the box at "Never send it to Spam", and then click on "Create filter".
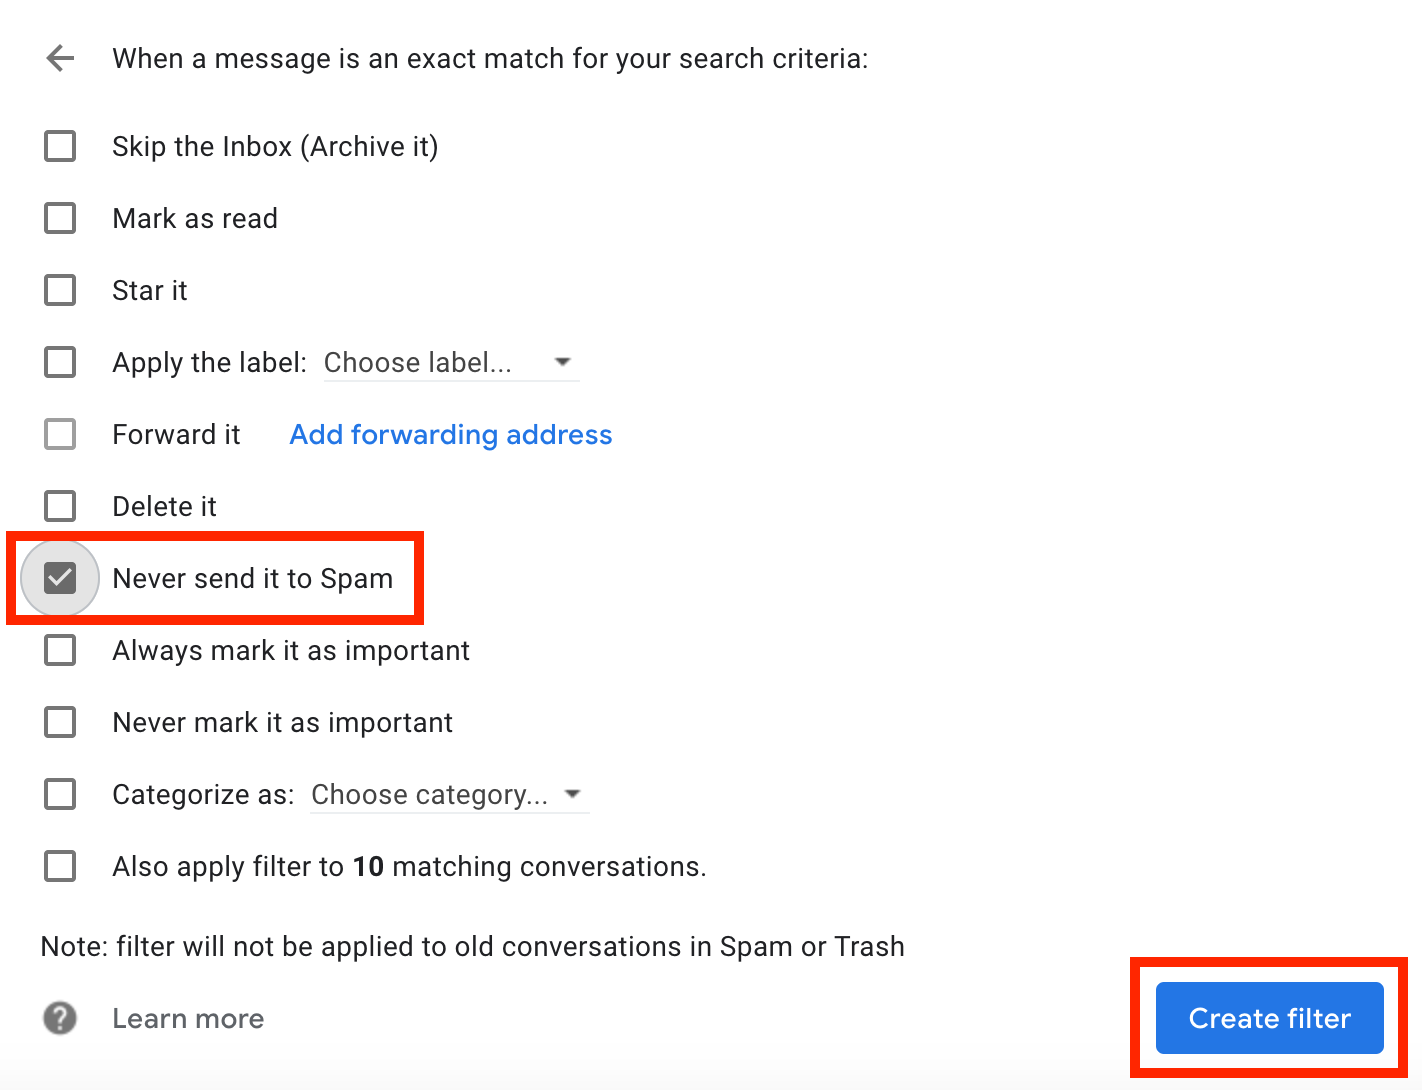
6. Done! You should now be getting future e-mails from us in your inbox.
Note: If you were expecting another e-mail from us (such as confirmation e-mail needed to complete registration) then please contact our support representatives to resend the e-mail.
Apple (@me.com, @icloud.com, @mac.com)
1. Sign into your Apple iCloud webmail HERE.
2. Click on the "Settings" or gear-icon in the menu.
3. Next, click on "Add a Rule".
4. Create the following filter (if a message is from sender address @socialplus.net) then "Move to your inbox".
5. Click on "Done".
MSN (@hotmail.com, @outlook.com, @live.com)
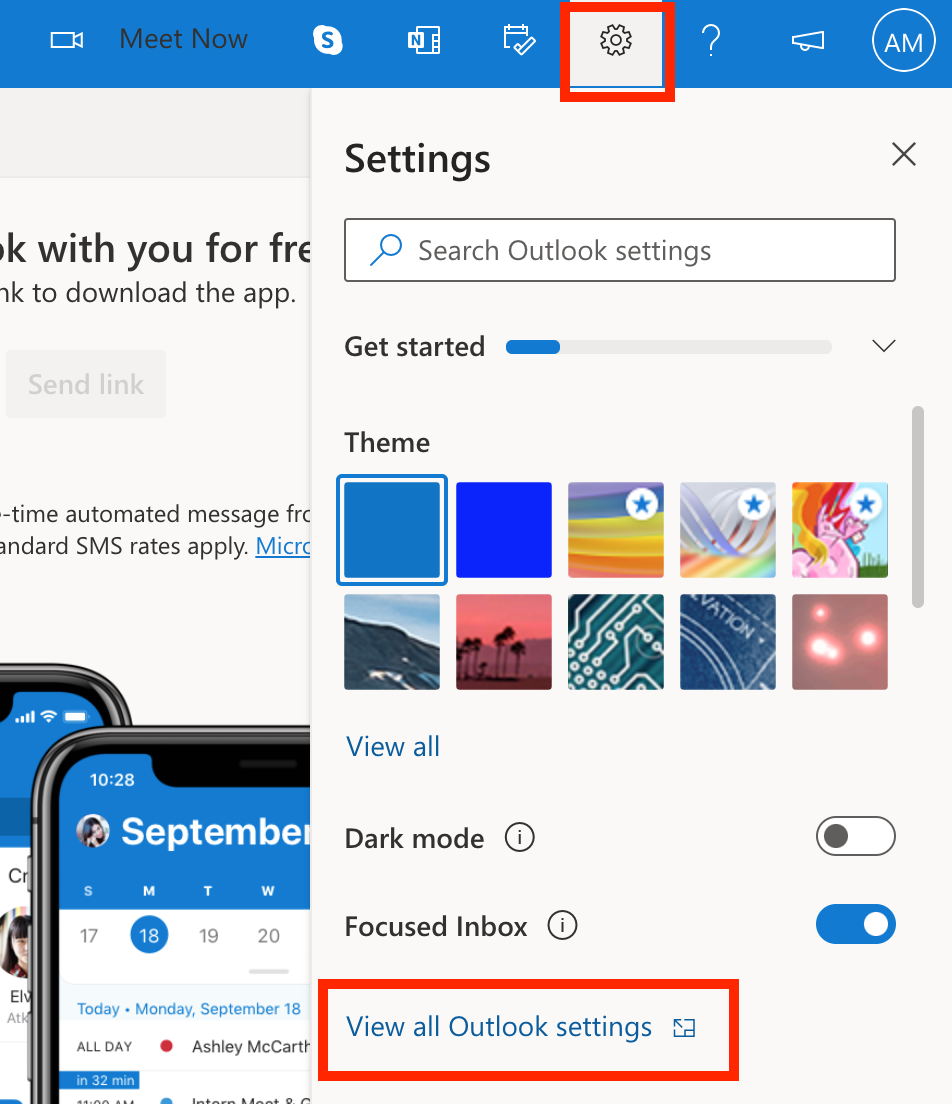
1. Sign into your MSN Webmail account HERE.
2. Click on the "Settings" or gear-icon in the top-right corner, and then "View all Outlook settings".
3. Under "Junk E-mail", click on "Safe Senders".
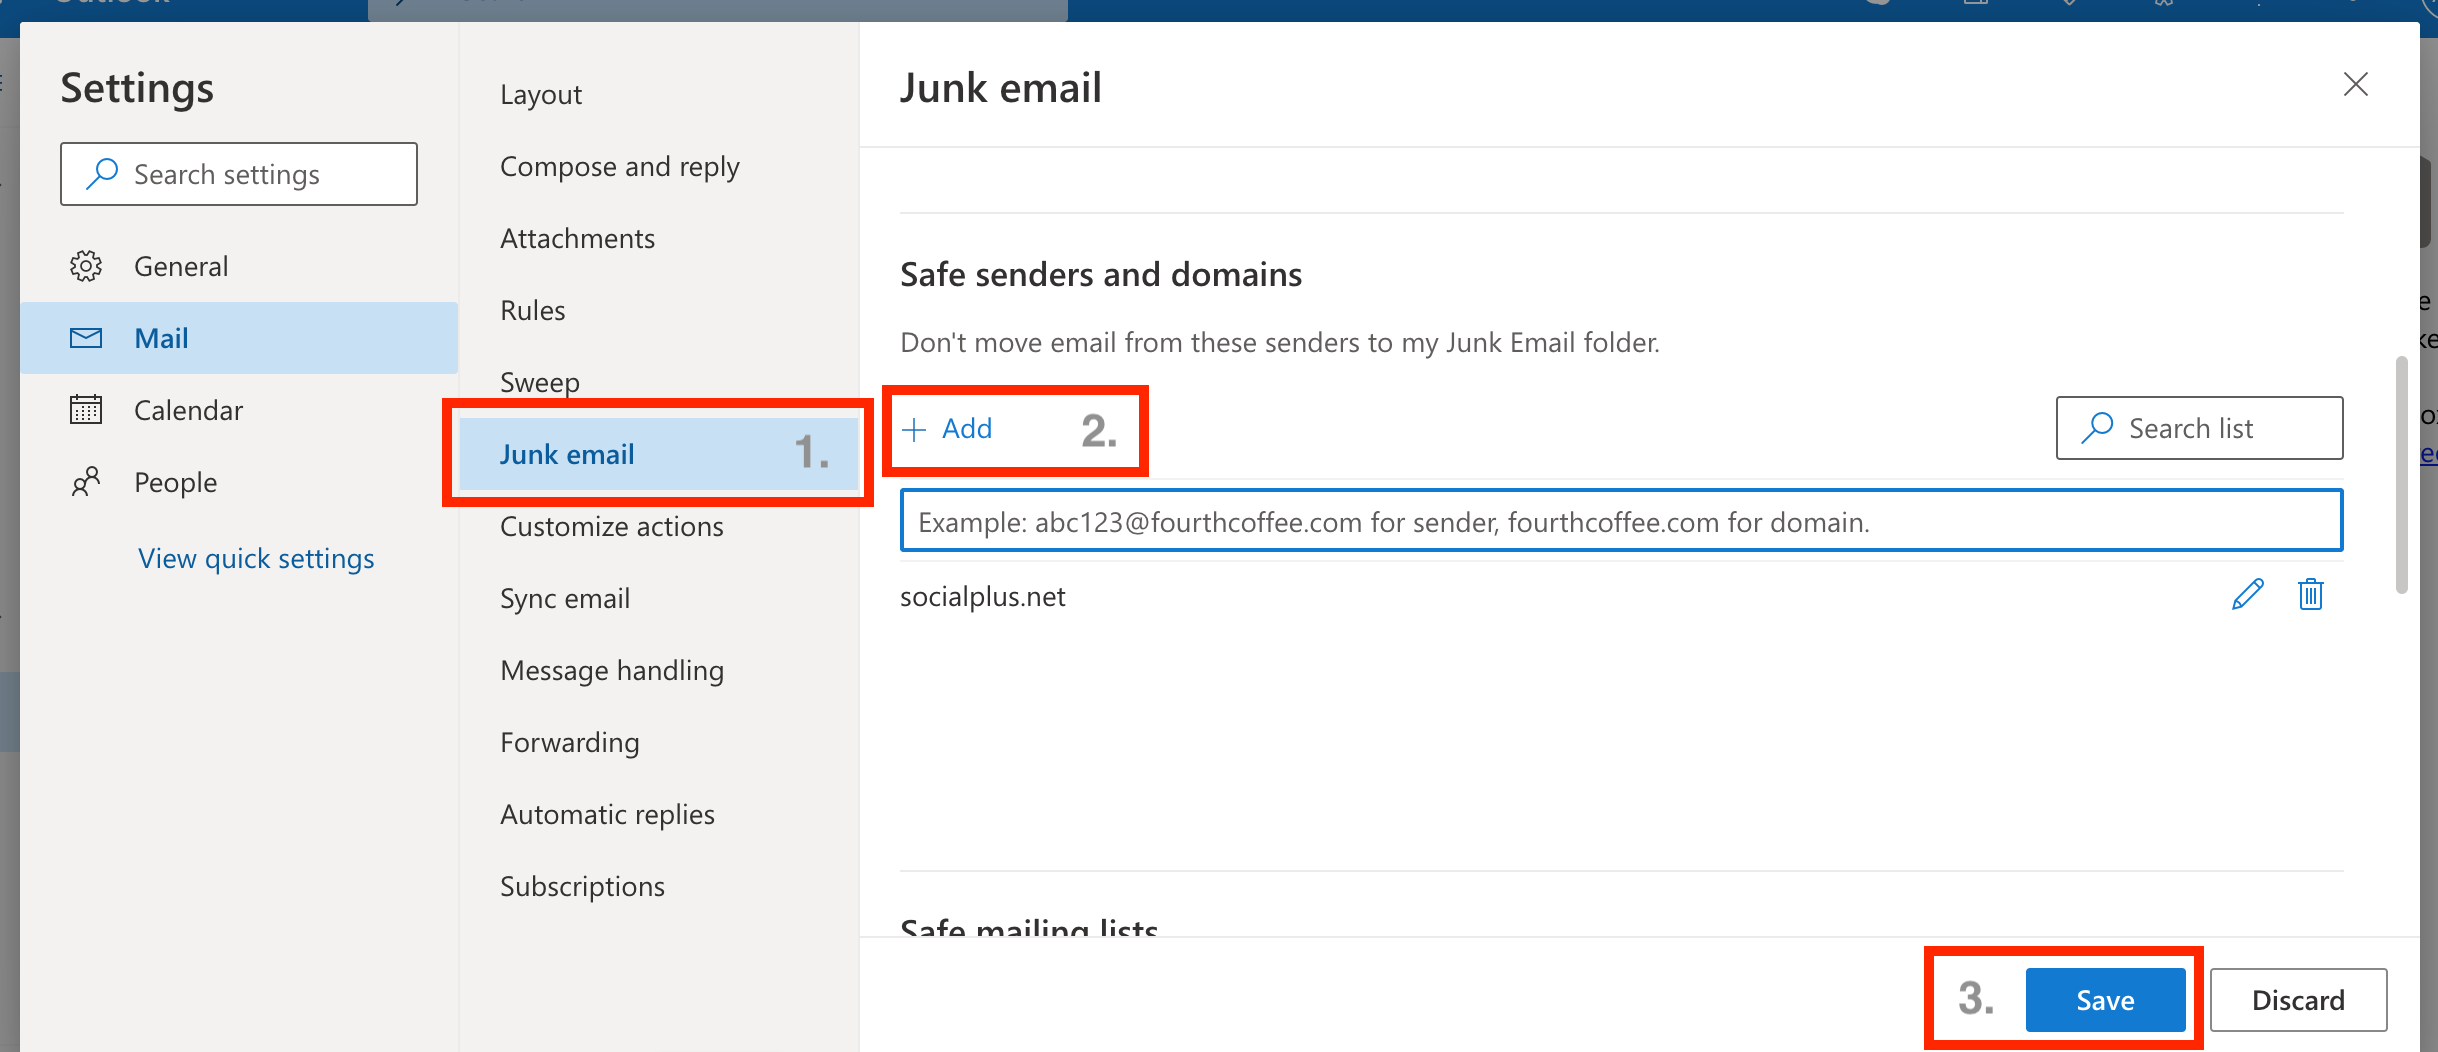
4. Next, enter our sender domain socialplus.net in the field and hit Enter. Click on "Save" when done, and close the window.
Tip: Also make sure that our sender address/domain is not under your "Blocked senders" list. If you see our sender address here, select it and click "Remove".
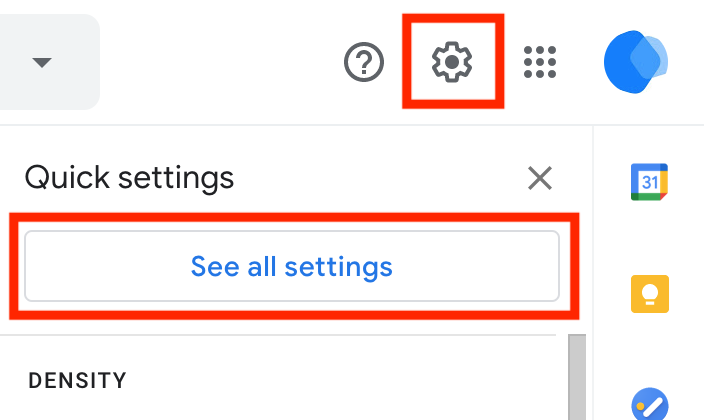
Yahoo! Mail
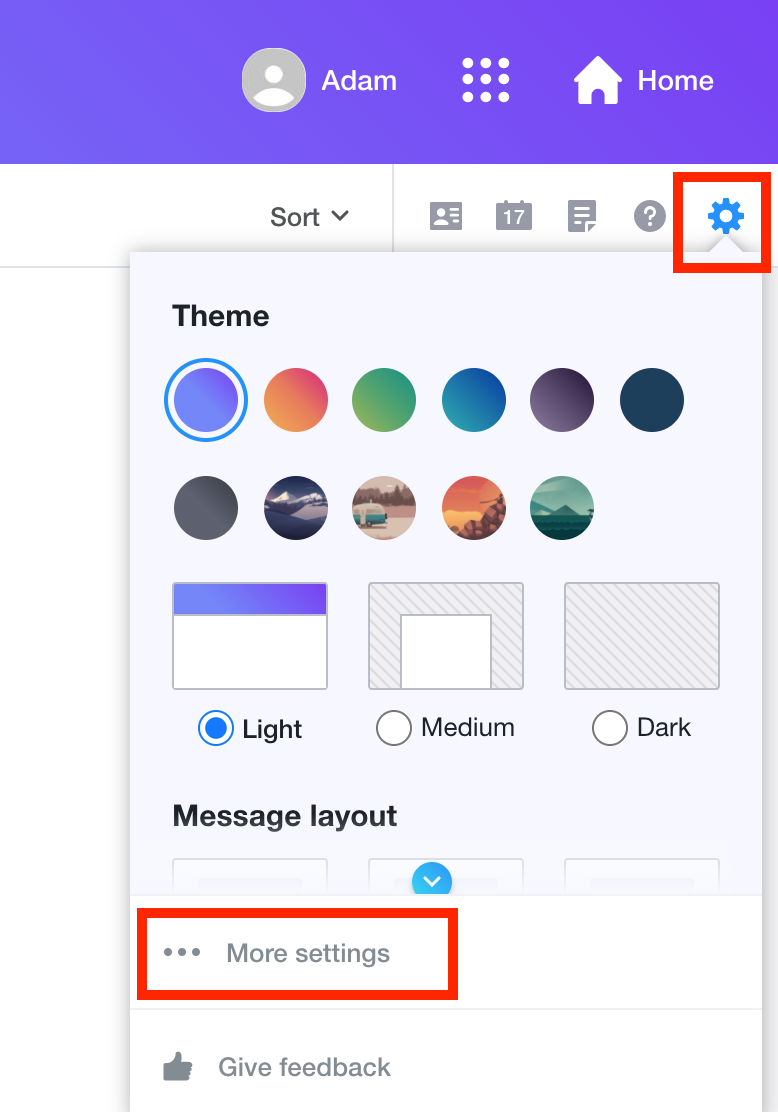
1. Sign into your Yahoo! Webmail account HERE.
2. Click on the "Settings" gear-icon in the upper right corner, and then "More settings".
3. Next, click on the "Filters" in the left menu, and then on "Add new Filter". This will show some fields in the tab to the right.
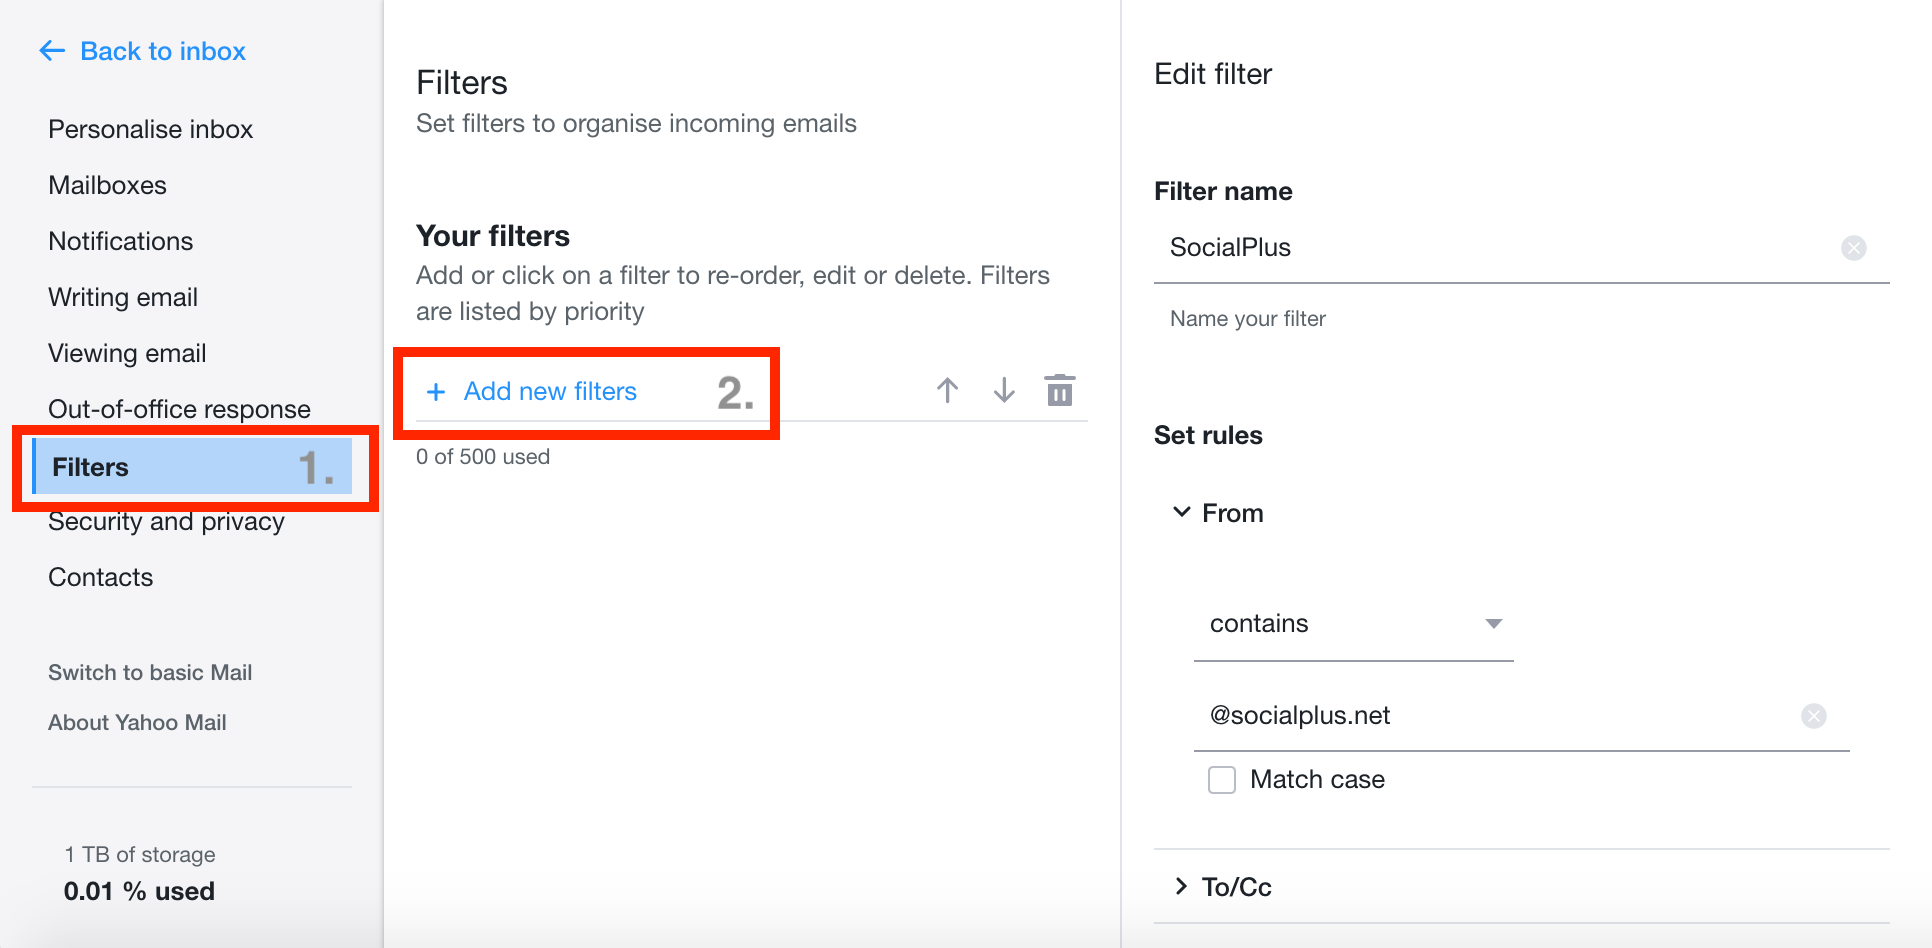
4. Enter any name in "Filter name". More importantly, in the "From-field" select "Contains" and enter our sender domain @socialplus.net as value.
5. Finally, at "Choose a folder to move to", select "Inbox". Then click on "Save".

6. All done! You should now be receiving e-mails from us in your inbox.
AOL Mail
1. Sign into your AOL webmail account HERE.
2. Click on the "Mail Options" menu and then "Address book".
3. Next, click on the "Add" button to add a new contact.
4. In the "Other E-mail" field type our sender address @socialplus.net, and check the box at "Primary E-mail" (if shown).
5. Click on "Save", and you are done!
You're all set!
Once these steps are completed you should be receiving future e-mails from us in your inbox. If you are still waiting on the registration e-mail to complete your account, then please contact our support representatives to resend it, once you whitelisted our sender address.